| home | builders | Search |
| builders ➜ Cabinets ➜ 3D-printed & Skeletor Nodebox 2024 |
1. IntroductionJason K4APR started this. See history below. In spring 2024, Stephen NY4NC, Fin NC4FG, and Tadd KA2DEW got together and came up with a plan to use 3D-printed panels on a lightweight Blond-wood frame, to build a TARPN node box. (Nodebox). This is a departure from Jason's boxes. Our hope is that every-ham can assemble this in their own shack with screwdrivers, glue, and some electrical tools that hams should have. We're limiting the sizes of the objects to those that can be handled by second-generation hobby printers, now costing $300 or so. The print material is PETG so temperature control of the base-plate and hot-end will be required, but enclosures will not be required. PETG was chosen because it stands up under warm temperatures and constant pressure better than PLA and it is easier to bring with than ABS.Note: These are our suggestions. More detail may be forthcoming. Feedback is welcome. I'm hoping that any team of 10 or so node-builders will have at least one 3D-printer. Check out the TARPN Discord server for discussion about what printer, and for new print suggestions. Write to [email protected] Email reflector to ask for connection to the Discord server. The designs provides two different Nodebox widths and variable heights from about one foot to several feet. There are two basic designs, single-wide with one radio for each 4" (100mm) plus 4 inches of Raspberry PI and power, and double-wide with two radios for each 4" (100mm) of height plus 4" of Raspberry PI and power. The single-wide Nodebox is 254mm across the front and the double-wide is 508mm across. (Are this numbers correct??? -tadd) Both designs have 200mm between verticals on the sides. Both designs use the same top-panel 3D objects. Each of the single-wide and double-wide can be 2 or more levels high. It is standard that the bottom level will have the Raspberry PI and control panel, but a battery backup subsystem (with display) is also optional and may take its own level on a single-wide Nodebox.
SkeletorThe nodebox frame, by NC4FG, is called Skeletor, since it serves as the skeleton for our node box. See section 4: Skeletor Wooden Structures, below.For the time being, Fin will be making the woodcuts but the wood parts required to assemble the frame are small enough to be UPS mailed, if necessary. Because the wood pieces are very thin, we should be able to make a dozen or more of the Skeletor frames from a single $70 piece of Lowes Hardware "Blondwood" plywood. We will provide special 3D-printed measuring devices useful for setting nails and screws into the wooden parts. These tools would be used in advance of and following the assembly of the Skeletor frame. These tools will also verify the space between frame struts to verify the frame's compatability with the Nodebox 3D-printed parts. The total cost of outfitting a node box, including power supplies, fusebox, fan, wood, and 3D-print filament, will be under $100. We'll try to 'finish' some instructions to go through the entire process including cutting, crimping, soldering, screwing, and gluing, all the way until the thing is working. HistoryFall 2023: Jason, K4APR used his 3D printer to make brackets that attached to Jason's well-crafted (professional quality) heavy shell that is about 8" wide and of variable height, from 15" to 28", box, made out of 3/4" plywood. The 3D-printed items were about 200mm wide (3D-printers use millimeters. It's not my fault! -ed) and screwed precisely into the edges of the 3/4" plywood in pre-drilled holes. He made a couple of dozen of these boxes and mounted many radios, Raspberry PI brackets, coax sockets, power supplies and etc.Jason's cabinet construction and assembly process requires a keen eye for alignment of the parts, and great tools including a very nice table saw, with two people to do the cuts in the heavy plywood. Jason's woodshop looks like a Yankee Workshop (USA TV show) setup. Your editor brought some of his cabinets home, unpopulated, and managed to bugger up the thing, splitting plywood and having some trouble getting the faceplates to line up. While I realize that I'm actually below average at mechanical work, I think I have an appreciation for a well-made product, so I was really frustrated with my results. I really liked the end-product of Jason's work, but I am pretty sure that I don't want to be involved in fostering failure with other hams who are not awesome at cabinet work. While belly-aching about my poor performance at woodworking in the NCPACKET over-the-air chatroom, Fin and Stephen both offered their own suggestions. I talked both of them (they were eager, it wasn't hard!) into working with me on a Tadd-proof box design. As of this writing, we're still working on it. This webpage will show the fruits of their labor and the results of my jabbing them with proverbial forks to make the result fully Tadd-proof, functional, and outrageiously pretty. |
|||
2. Photos of Completed Nodeboxes | |||
| This section shows photos of the several models of 3d-printed & Skeletor Nodeboxes. Click on the photos and links for more details and specifications. | |||
| Single-port Single-wide |
 |
Click for side and back view | |
| Four-port Single-wide |
 |
Click for side and back view | |
| Two-port Double-wide |
|
Click for side and back view | |
| Four-port Double-wide |
|
Click for side and back view | |
3. Assembly InstructionsWe have preliminary assembly instructions. There will be enhancements including imagery, diagrams, and whatnot.Very early assembly instructions are here. |
|||
4. Skeletor Wooden Structures and Kits from NC4FGThis section details the Skeletor kits and dives into specifications, manufacturing and assembly details as well as availability and contact information. |
|||
5. 3d-printed components |
|||
|
These components are those that we use in any of the Nodeboxes shown above.
In some case there are more than one of a component in the housing.
I will try to describe what each component does, what is required to use it, which boxes it goes with, and so on.
There are multiple versions of some of these components. I'll try to have the latest STL file and a photo of the latest item by itself, though the item shown in the demo boxes up top may not be the latest. The colors used will be up to the individual 3D-printer operator, though we'll no doubt be trying to find and understand the artistic and practical ramifications of various color combinations. |
|||
Top panelUse 4 on a single-wide Nodebox or 8 on a double-wide Nodebox. |
 |
right-click for STL file
 |
|
Side panel top or bottomUse 3 on a any Nodebox. |
 |
right-click for STL file v2.1
 |
|
Power PanelLower right side panel provides fuse-box mout, HP power supply mount, power connector for Meanwell charger supply.Use Mouser 693-6100.3300, or Schurter 6100.3300 for the AC power connector. Fuse box is Amazon sourced WUPP 6-port automotive box with integrated ground bus. Round wells with 8-sided star are break-out holes for bulkhead coax barrel connectors. Use 1 on any Nodebox. |
Note: Photo is of the previous design which did not support the fuse box. Click to embiggen |
right-click for STL file v5.0
 |
|
Side panel middleUse 2 for each layer of the Nodebox except for the top layer and the bottom later.There is a special top panel and a special bottom panel (actually 2 different bottom panels). If your Nodebox is only 2 layers tall, i.e. 3 horizontal struts tall, then you won't be needing this panel. If your Nodebox is a 4-port single-wide box, it will have 5 horizontal struts across the side, and will need 3 of this panel on each side, i.e. 6 copies. Note that this panel has 4 push-out coax connector holes. Only punch these out if you are going to use them for pig-tail ends, or pass-through barrels. Check before pushing them out. If you are going to place this panel on the left side of the box, you can invert it so the coax connectors would not interfere with the transceiver sitting next to it. |
 |
right-click for STL file
 |
|
Power support bracketUse 1 per Nodebox.This item is the mount for the Meanwell (charger) power supply and also the DC-end support for the HP power supply. Attach AC power and DC output to the Meanwell supply, then screw the Meanwell into this bracket such that the AC connections lead out to the right. See Meanwell 3D-print assembly instructions here. This item is attached to the bottom and 2nd rear horizontal struts. The HP supply shell should pass half way into this bracket such that the power connection screws are shrouded by this bracket. |
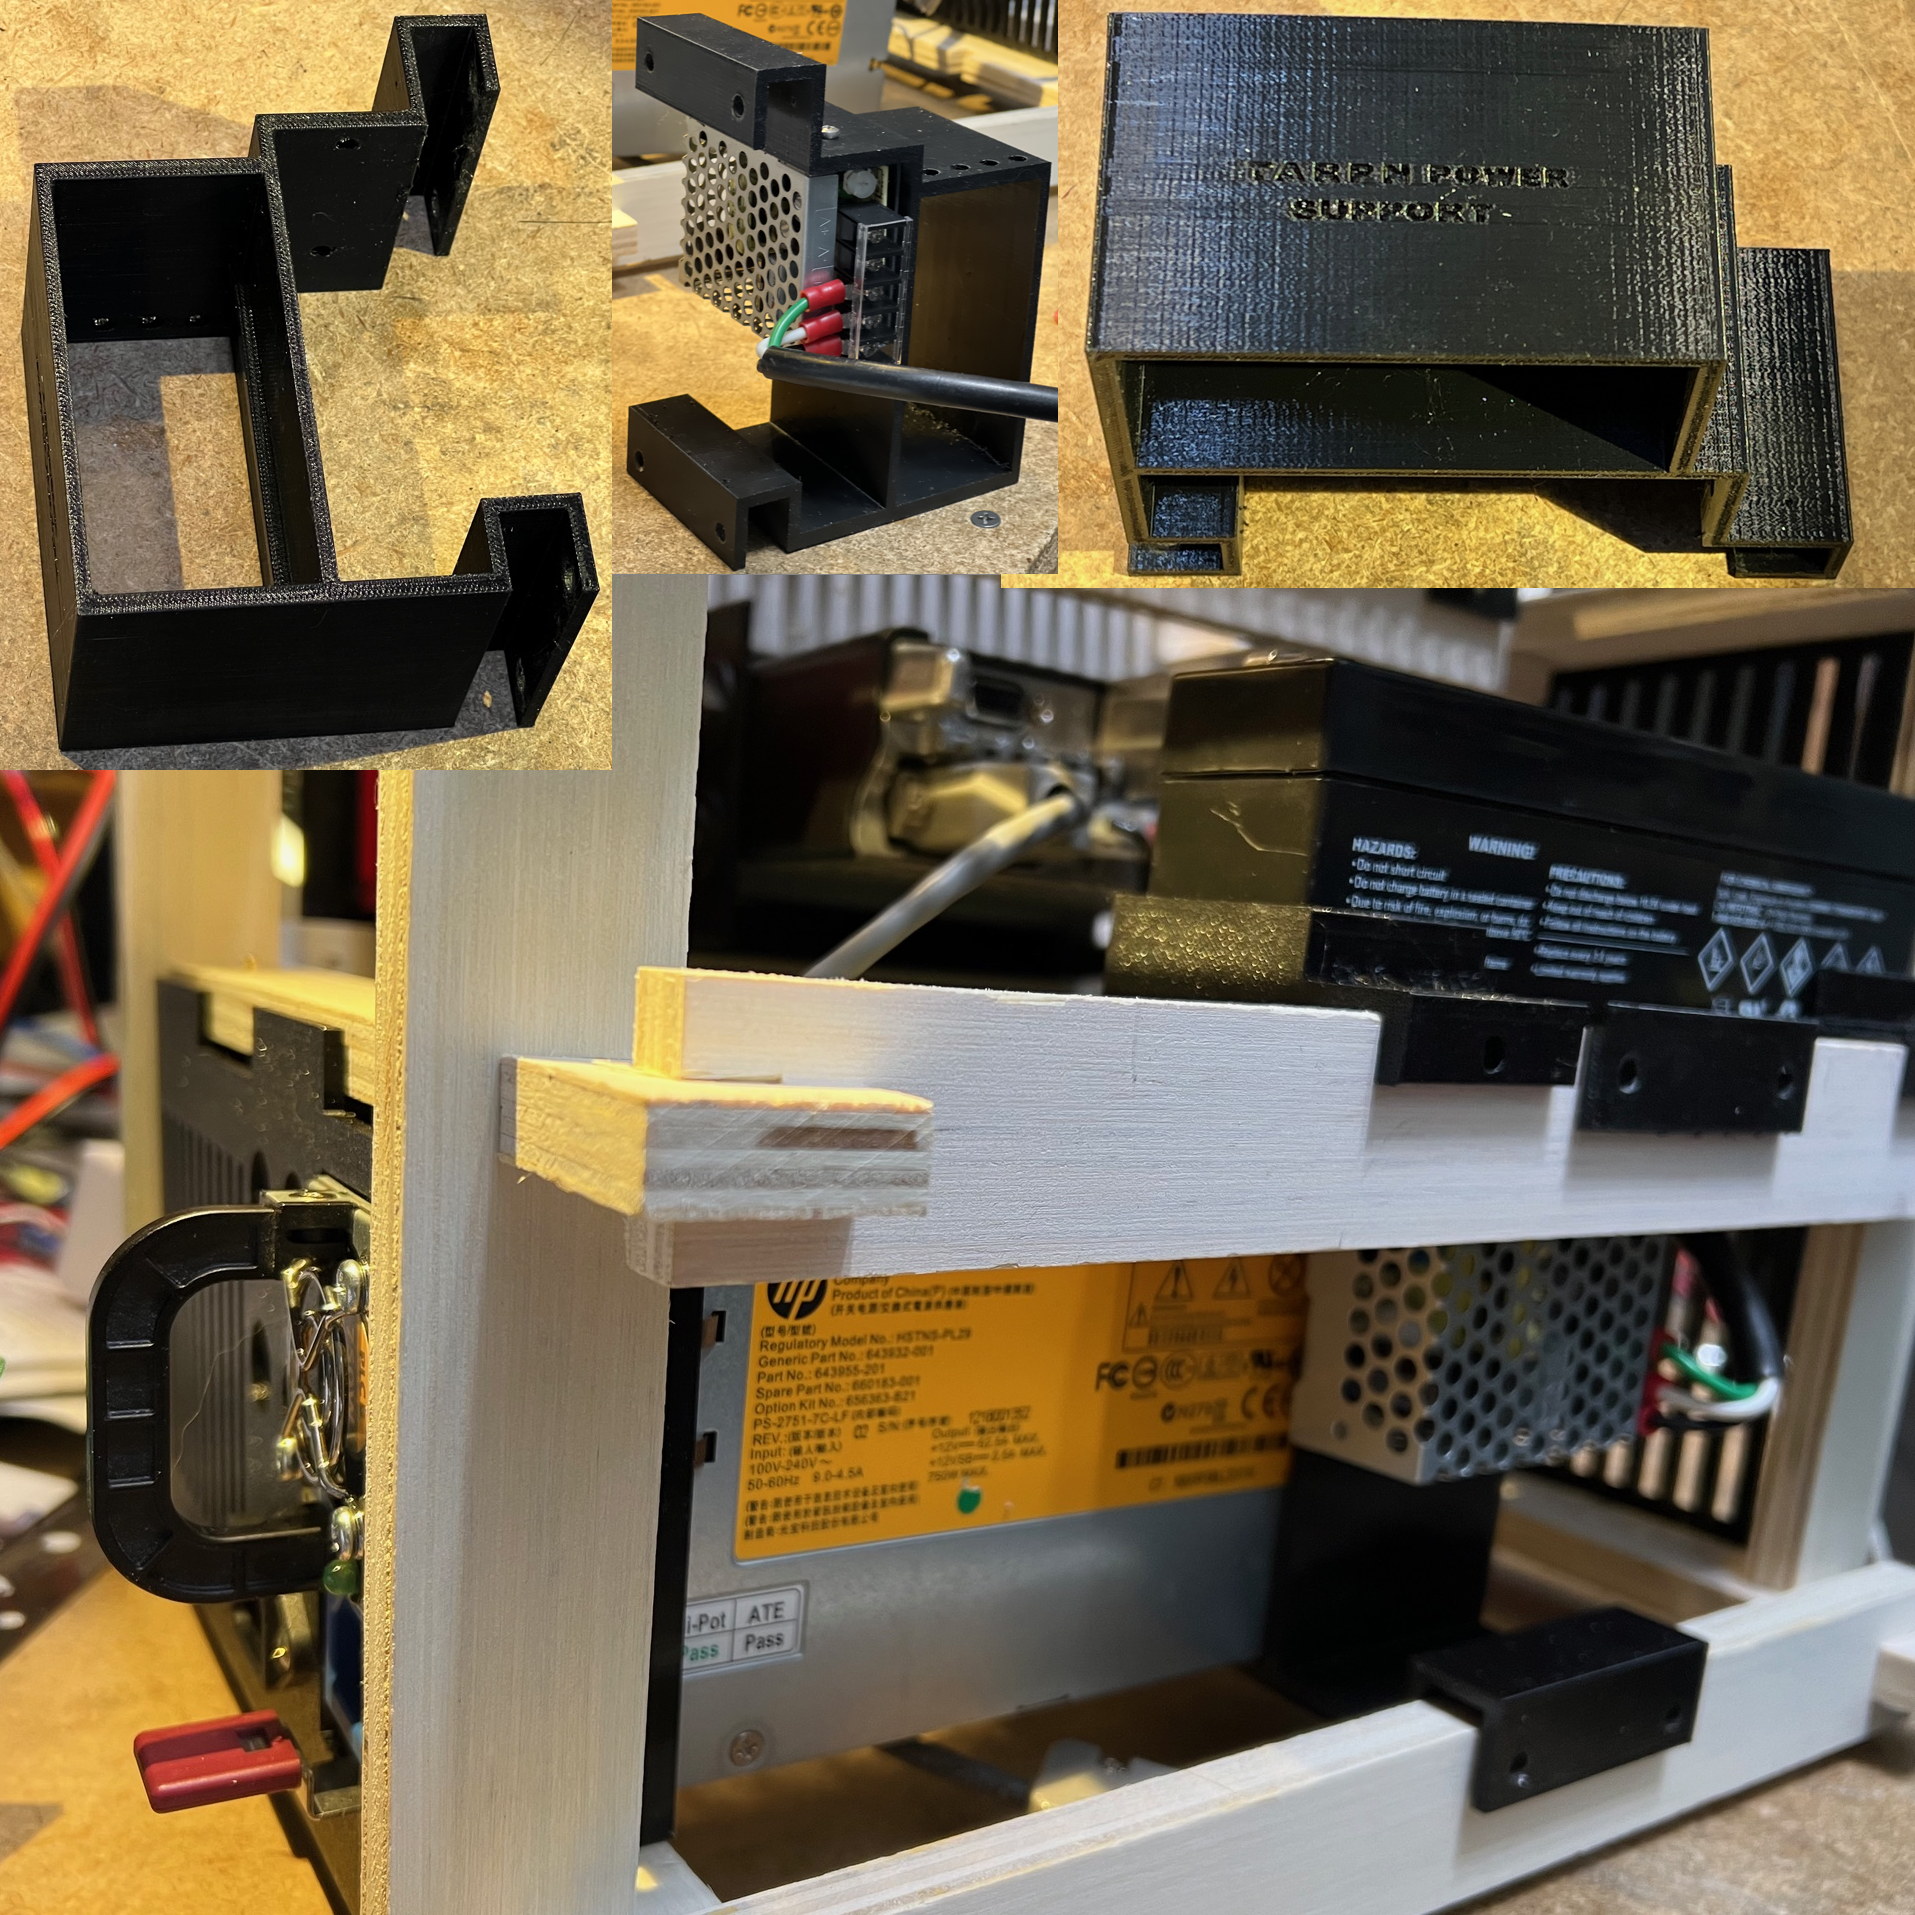
Click to embiggen |
right-click for STL file
 |
|
Battery box leftUse one per Nodebox. |
 |
right-click for STL file |
|
Battery box rightUse one per Nodebox. |
 |
right-click for STL file |
|
NinoTNC Wide Double FaceplateUse 1 per port-pair on a double-wide Nodebox |
 |
right-click for STL file
 |
|
NinoTNC Wide Single FaceplateThis could be used on the lower level of a doublewide Nodebox. |
 |
right-click for STL file |
|
NinoTNC Wide SMT TrayUse 2 per port-pair on a double-wide Nodebox but only if using NinoTNC SMT unitsThe handle is added separately. The composite image shown is of two different prints. Note that the SMT NinoTNC LEDs and controls are flush with the front of the tray for maximum visibility. |
 |
right-click for STL file |
|
NinoTNC Wide SMT Tray HandleUse with the NinoTNC SMT Wide Tray. There will be one of these per SMT Wide Tray. |
 |
right-click for STL file |
|
NinoTNC Wide A4 (kit) TrayUse 2 per port-pair on a double-wide Nodebox but only if using NinoTNC A4 units |
|
right-click for STL file |
|
NinoTNC Wide A4 (kit) Tray HandleUse 2 per port-pair in a double-wide Nodebox. The same handle works for NinoTNC SMT and NinoTNC A4 trays. |
|
right-click for STL file |
|
NinoTNC Vertical FaceplateUse 1 per port on a single-wide Nodebox |
|
right-click for STL file |
|
NinoTNC Vertical SMT Tray |
|
right-click for STL file |
|
NinoTNC Vertical SMT Tray Handle |
|
right-click for STL file |
|
NinoTNC Vertical A4 (kit) Tray |
|
right-click for STL file |
|
NinoTNC Vertical A4 (kit) Tray HandleUse 1 per port on a single-wide Nodebox. The same handle works for NinoTNC SMT and NinoTNC A4 trays. |
|
right-click for STL file |
|
Kenwood TK762 radio mount faceplateUse 1 per Kenwood radioNote that the STL is newer than the real image. We'll get a modern real image soon enough. |
 |
right-click for STL file |
|
Tait TM8xxx Radio Mount FaceplateUse 1 per Tait TM8xxx radio |
 |
right-click for STL file |
|
Yeasu FTM3100 Fadio Mount faceplateUse 1 per Yeasu FTM3100 radio.Note that the left hand side bracket (from the perspective of the front of the radio) is shorter than the right hand side. This is to get around the wire installed as part of the 9600 baud wire installation. Note that the STL is newer than the real image. We'll get a modern real image soon enough. |
 |
right-click for STL file
 |
|
Raspberry PI+Control-Panel Faceplate and Fan-mountUse 1 per NodeboxThis object has room for a TARPN Control Panel and a Fan. The demo box imaged here has this fan: Amazon ASIN: B08135WS3H |
 |
right-click for STL file
 |
|
Raspberry PI Fan GridUse 1 per NodeboxThis is an optional fan cover for the fan attached to the Raspberry PI Control Panel Faceplate and Fan-mount. |
|
right-click for STL file
 |
|
Raspberry PI TrayUse 1 per NodeboxThis object, when assembled, will include the DROK 5.2V Regulator, the TARPN Control Panel, the Raspberry PI, and the robust power-supply switchover/charge circuit. |
 |
right-click for STL file
 |
|
Raspberry PI Tray HandleUse 1 per NodeboxThis part is usually printed in a contrasting color from the Raspberry PI Tray and glues onto that tray. |
|
right-click for STL file
 |
|
Raspberry PI Tray Diode Switch CoverUse 1 per NodeboxThis object mounts to the Raspberry PI Tray and covers the wiring for the rectifier and resistor used for the battery charger and 12V power switch. See the TARPN builder power supply web page for robust power supply. |
 |
right-click for STL file
 |
|
Filler Faceplate NarrowUse one per Singlewide Nodebox. This is placed to the side of the Raspberry PI faceplate. |
 |
right-click for STL file
|
|