| home | builders | Search |
| builders ➜ Set Up Raspberry PI to be a TARPN Node |
| WARNING!!!!
The TARPN node system runs as user pi
You'll need to tell the Raspberry Pi Imager to create user pi. This process requires/creates a clean install on the µSDcard. It does not tolerate files added to the process before or during the installation. The installation will include two resets, one after the TARPN-START1 installer completes, and the second after the TARPN-START2 installer completes. If you are moving a backup from a previous node instance, don't do that move until after the installation process has completed. You'll know this because the tarpn command yields "BPQ node is NOT running." |
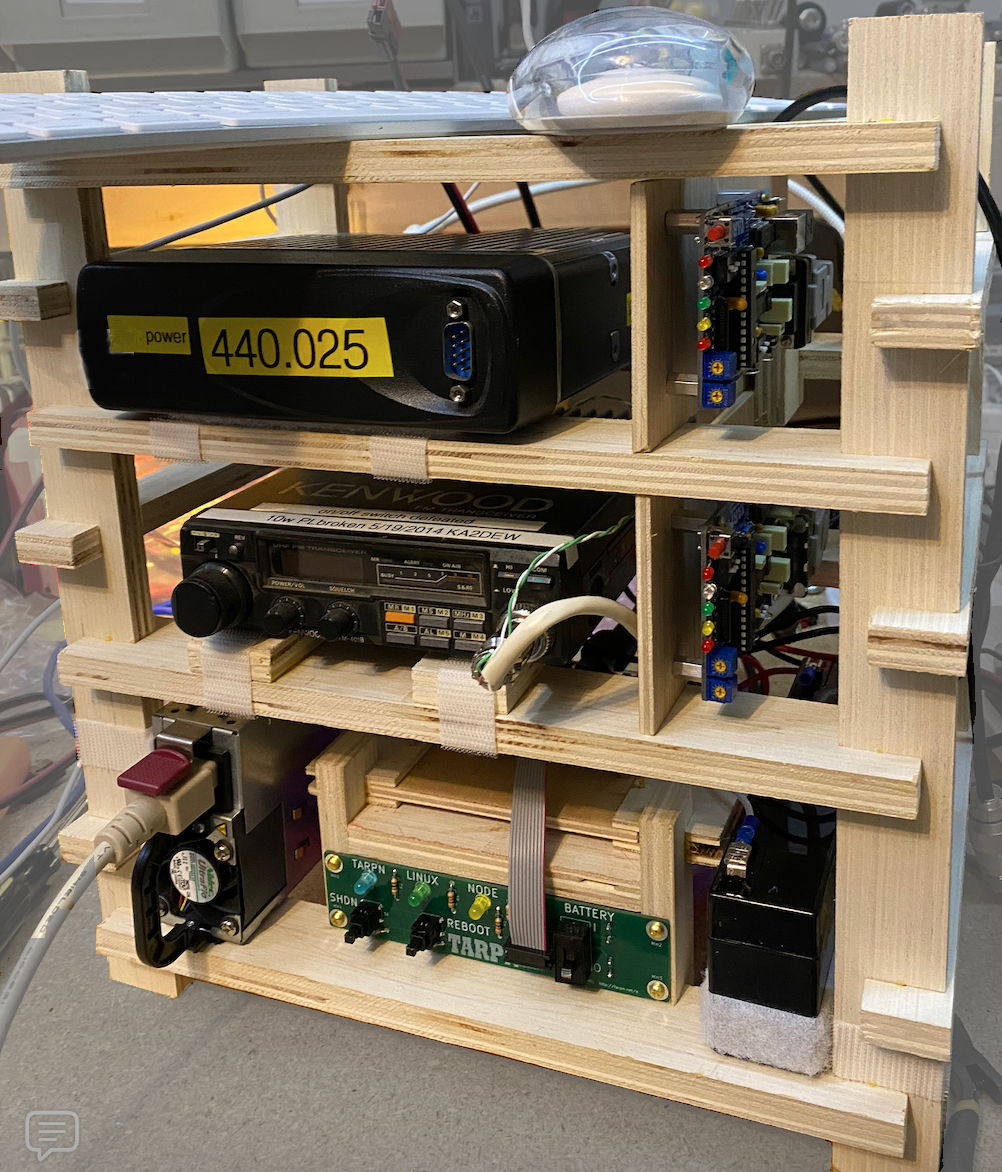
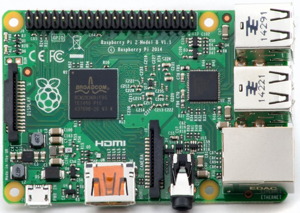
Set Up Raspberry PI to be a TARPN NodeThis document is the initialization procedure for a Raspberry PI and TNCs of a couple of types. By following this recipe, even a newcomer to ham radio and Linux can create a functional TARPN node. The scripts referenced in this document do most of the work. The node will have user access features permitting an operator to converse with other stations on the TARPN. Ports on the node are created by attaching TNCs (Terminal Node Controllers) to the Raspberry PI. Supported hardware are all KISS TNCs that cam be connected via USB, such as the KPC3 and NinoTNC, and serial-to-USB connected KISS TNCs. Additionally, software running on the Raspberry PI may access the node, and vice versa, permitting network services and tools to be launched.A linked document walks the operator through setting up the NinoTNC units. NinoTNCs use USB cables with optional USB hubs. Serial-port connected TNCs must be separately initialized for KISS and that is not covered by this document. |
|
The document assumes you have a desktop or laptop computer and know how to use command-line tools as you might in MSDOS. Linux experience will be a result of messing around with a TARPN node. But if you are already a Linux or Unix user, and even though you might find some of this document boring, please go through it anyway. If you find any mistakes or missing info, please contact us via the TARPN email list/reflector.
I’m trying to make the document clear enough that any other computer user has a chance at going through this, but there may be some subtleties that an experienced user may miss by skimming. Please pay attention. I also expect that if you are primarily a Linux user, you can translate the MSWindows-centric and Mac-centric descriptions.This document contains information sourced from G8BPQ from AG6QO, KF4LLF. The scripts were written by KA2DEW with help from many others.
We recommend you work with other hams and arrange to have a network of five operators, where each station is within 2m HT simplex of the next station, who could each host a node in their homes (maybe with a 6th at a mid-site?) to fully test and demonstrate the network. You should try to have all five hams committed to the project, and have full-quieting simplex links tested, before installing this system else your labors are likely to lead to disappointment and frustration. Five active participants may be the magic number where the killer app (chat) is interesting enough to lead to grassroots network growth. The proximity required for simplex HT connectivity makes it very easy to get the system installed and working. This is of high value to new network builders. Furthermore, the cost of antennas when stations are local is much less than will be required for longer links.
Until a grass-roots critical mass of hams involved is reached, we recommend you build up a portable system. Your last demo before installation should consist of a 5 station portable (i.e. each of the five stations is a self-contained single cabinet, not dependent on immovable DC supplies) set of equipment so you can take all of it out for demonstration purposes. The TARPN group consists of well over 400 hams who are conspiring to make network construction easier and cheaper while increasing the performance and enhancing the user experience once the system is working. Once you have two Raspberry PIs communicating on your desk, and once you have five hams in full quieting simplex range or within HT range, contact the TARPN group via our email reflector and talk about what you want to do and who you want to do it with. The group will figure out what resources could make your job cheaper. A group project is more fun, and doing things in quantity saves money and time while creating local specialist/experts to make future growth less expensive or difficult.
|

|

|
|
|

|
|
Obtain a laptop or workstation with a µSDcard reader/writer, or get a read/write dongle for your computer.
Obtain a 16GB or 32GB µSDcard for your computer. (Larger works but is more expensive and sometimes slower) |
|
|
Go to Raspberry PI org and get their Raspberry PI Imager SDcard preparation software. Install the Raspberry PI Imager on your workstation. Insert a 16GB or 32GB µSDcard. If your OS pops up a notice about the card, don't let your OS format it. Instead, cancel out of that format/initialize dialog box. Run the Raspberry PI Imager tool. If it offers to update itself, you should do that. The startup menu lets you select the Raspberry PI version you are using. Note that this is used to limit the OSs available, to those that will run on your device. The install you are making is portable to any device that is compatible with that OS. Click on the device's name and then click NEXT |

|
|
The next menu that appears will be for choosing the OS to install. Find and select Raspberry PI OS (legacy, 32bit). The small print underneath should be A port of Debian Bookworm with security updates and desktop environment. Click the NEXT button to move to the next screen. The list may include your workstation's boot drive (depending on whether there is an Exclude System Drives option, but any other large and important storage media you have on your system. Usually the µSDcard is small, 8GB to 256GB, depending on what you used and it probably has a name that sounds like a removeable media. |

|
|
Here is where you get the maximum opportunity to screw up badly. You are going to be asked to format and re-write one of your computer's storage media. Since you have plugged in a µSDcard, that card will show up on this list along with your workstation's boot drive and any other storage devices you have plugged in. Usually the µSDcard is relatively small, 8GB to 256GB, depending on what you used and it probably has a name that sounds like a removeable media. Click on the entry for your tiny-sized (gigabytes) µSDcard and then click NEXT. If you have any doubts about which drive is the µSDcard, stop and read the information on the screen very carefully. Here, the µSDcard shows as having 14.8 GB of storage. That's typical for a 16 GB µSDcard. |

|
| The next menu is where you specify the hostname of the PI. Name the PI like you'd name your packet node, with your first name, unless you have an inside connection about a better name. We like to use personal names rather than towns because frequently a successful node install is followed shortly after by a geographically close friend of yours making yet another node, in the same neighborhood. Since we are a close community, it's not unlikely that somebody helping you will need to get to your node to do diagnostics or leave you a note. Type your first name followed by packet. Click the NEXT button |

|
|
Localization
The next menu is for setting time-zone and WiFi country for the PI OS. Select your country's capital (country), a city in your time-zone, and the keyboard layout you'll be comfortable with. Click the NEXT button |

|
| This is the Choose username customization menu. Type a username of pi. Username = pi is required for the TARPN software. Hopefully this is not a security risk as it will be inside your house's firewall/NAT box and it won't be accessible from the Internet. Set the password and confirm password to something you'll remember. I use pika2dew for my node PIs. You'll use this username and password for control and file transfer to the Raspberry PI from a PC, Mac or Linux computer in your local (home) network. Click the NEXT button |

|
|
Configure your Raspberry PI's WiFi if you will use WiFi to have the PI show up in your local LAN.
This isn't necessary for some sites as they may be on an Ethernet LAN or the node may be controlled with a local screen and keyboard.
A LAN connection to larger computer is sometimes handy for backups or software updates. Some people never hook a keyboard and mouse up to their node after initial config is complete. If it is a good thing for you, set up WiFi here. Click the NEXT button |

|
| Remote access - SSH authentication SSH (secure shell) is the method by which a terminal/command line device can access the Linux on the Raspberry PI to do commands and run the TARPN node. Programs like PUTTY, LXTerminal and Terminal (depending on what OS your workstations use) will talk to the Raspberry PI using SSH. Unless you have superior knowledge of this type of thing, please enable SSH and tell it to use password authentication. Click the NEXT button |

|
|
Write image
This menu screen is telling you what you have done and are about to do. Click the WRITE button Watch for pop-up menus because your computer will ask you something like are you insane?? and you may need to enter a password. |

|
|
Wait for the OS to be fully written and verified. The Raspberry PI imager ejects/unmounts the card for you. Unplug the µSDcard from your computer/adapter and install it in the non-powered Raspberry PI |
|

pi@lumoxpacket ~ $ |
wget https://tarpn.net/w
chmod +x w
./w
The script will run for between 10 minutes and about an hour (depending on your connection speed and which Raspberry PI you have). The script prints out the 'uptime' of the Raspberry PI so if you walk away, and it finishes, you can find out how long it took.
pi@lumoxpacket ~ $  wget http://tarpn.net/w

--2021-10-20 13:55:12--  https://tarpn.net/w
Resolving tarpn.net (tarpn.net)... 107.180.13.247
Connecting to tarpn.net (tarpn.net)|107.180.13.247|:80... connected.
HTTP request sent, awaiting response... 200 OK
Length: 2662 (2.6K) [application/x-sh]
Saving to: ‘w’

w       100%[===================================================>]  2.58K  --.-KB/s    in 0.008s

2021-10-20 13:55:12 (1.39 MB/s) - ‘w’ saved [2662/2662]

pi@lumoxpacket ~ $  chmod +x w
pi@lumoxpacket ~ $  ./w
######
######
######  =W                         Bookworm004=
######
######
######
 16:35:56 up 1 min,  3 users,  load average: 0.62, 0.32, 0.12

--2026-04-13 16:35:56--  https://tarpn.net/bookworm2024/tarpn_start1.sh
Resolving tarpn.net (tarpn.net)... 172.67.210.26, 104.21.34.243, 2606:4700:3031::6815:22f3, ...
Connecting to tarpn.net (tarpn.net)|172.67.210.26|:443... connected.
HTTP request sent, awaiting response... 200 OK
Length: 20038 (20K) [application/octet-stream]
Saving to: ‘tarpn_start1.sh’

tarpn_start1.sh                  100%[========================================================>]  19.57K  --.-KB/s    in 0.001s

2026-04-13 16:35:57 (17.9 MB/s) - ‘tarpn_start1.sh’ saved [20038/20038]


OK tarpn_start1.sh
##### tarpn-start-1 downloaded successfully
 16:35:57 up 1 min,  3 users,  load average: 0.62, 0.32, 0.12
##### Transfer control from W to TARPN START 1
######
######
###### =TARPN_START_1.SH          Bookworm008=
######
######
######
 16:35:57 up 1 min,  3 users,  load average: 0.62, 0.32, 0.12

##### Start platform check #####
_countb= b03111
_value5B4g = _value5B4g
Linux ok: VERSION="12 (bookworm)"
Your Raspberry PI is running the expected Linux version


###### Install IPUTILS-PING if it is not already here
Reading package lists... Done
Building dependency tree... Done
Reading state information... Done
0 upgraded, 0 newly installed, 1 reinstalled, 0 to remove and 0 not upgraded.
Need to get 44.0 kB of archives.
After this operation, 0 B of additional disk space will be used.
Get:1 http://raspbian.raspberrypi.com/raspbian bookworm/main armhf iputils-ping armhf 3:20221126-1+deb12u1 [44.0 kB]
Fetched 44.0 kB in 1s (85.6 kB/s)
(Reading database ... 138170 files and directories currently installed.)
Preparing to unpack .../iputils-ping_3%3a20221126-1+deb12u1_armhf.deb ...
Unpacking iputils-ping (3:20221126-1+deb12u1) over (3:20221126-1+deb12u1) ...
Setting up iputils-ping (3:20221126-1+deb12u1) ...
Processing triggers for man-db (2.11.2-2) ...
###### Proceeding with installation

using a source URL of: https://tarpn.net/bookworm2024

###### Download TARPNGET
tarpnget.sh ok
##### tarpnget downloaded successfully

###### Download SLEEP-WITH-COUNT
sleep_with_count.sh ok
##### tarpnget downloaded successfully
###### Download TARPN INSTALL 1dL

tarpn_start1dl.sh ok
##### script 1dL downloaded successfully
##### Transfer control from TARPN START 1 to TARPN START 1dL
###### This is the tarpn_start1dl script
###### version number is:
###### =TARPN_START1DL.SH         Bookworm044=


#####
#####
##### Verify proper environment for running this script
#####
#####
 16:36:14 up 1 min,  3 users,  load average: 0.58, 0.33, 0.12


This SD card is 1776112575
Install an FTP client
Reading package lists... Done
Building dependency tree... Done
Reading state information... Done
The following additional packages will be installed:
  tnftp
The following NEW packages will be installed:
  ftp tnftp
0 upgraded, 2 newly installed, 0 to remove and 0 not upgraded.
Need to get 152 kB of archives.
After this operation, 280 kB of additional disk space will be used.
Get:1 http://raspbian.raspberrypi.com/raspbian bookworm/main armhf tnftp armhf 20210827-4+b1 [114 kB]
Get:2 http://mirror.umd.edu/raspbian/raspbian bookworm/main armhf ftp all 20210827-4 [37.9 kB]
Fetched 152 kB in 1s (223 kB/s)
Selecting previously unselected package tnftp.
(Reading database ... 138170 files and directories currently installed.)
Preparing to unpack .../tnftp_20210827-4+b1_armhf.deb ...
Unpacking tnftp (20210827-4+b1) ...
Selecting previously unselected package ftp.
Preparing to unpack .../ftp_20210827-4_all.deb ...
Unpacking ftp (20210827-4) ...
Setting up tnftp (20210827-4+b1) ...
update-alternatives: using /usr/bin/tnftp to provide /usr/bin/ftp (ftp) in auto mode
Setting up ftp (20210827-4) ...
Processing triggers for man-db (2.11.2-2) ...
#####
##### Import telnetlib3 to bookworm using N2IRZ Jan2026 method
#####
Looking in indexes: https://pypi.org/simple, https://www.piwheels.org/simple
Collecting telnetlib3
  Downloading https://www.piwheels.org/simple/telnetlib3/telnetlib3-4.0.2-py3-none-any.whl (361 kB)
     ━━━━━━━━━━━━━━━━━━━━━━━━━━━━━━━━━━━━━━━━ 362.0/362.0 kB 1.0 MB/s eta 0:00:00
Collecting wcwidth>=0.6.0
  Downloading https://www.piwheels.org/simple/wcwidth/wcwidth-0.6.0-py3-none-any.whl (94 kB)
     ━━━━━━━━━━━━━━━━━━━━━━━━━━━━━━━━━━━━━━━━ 94.2/94.2 kB 2.2 MB/s eta 0:00:00
Installing collected packages: wcwidth, telnetlib3
Successfully installed telnetlib3-4.0.2 wcwidth-0.6.0
WARNING: Running pip as the 'root' user can result in broken permissions and conflicting behaviour with the system package manager. It is recommended to use a virtual environment instead: https://pip.pypa.io/warnings/venv
Install of telnetlib3 should be complete.
We are told that our use of telnetlib3 as root is ok in our system.
Ignore the error message.

Next line should have OK if this worked.
OK


##### get TARPN install script #2 to use at next reboot
tarpn_start2.sh ok
##### script 2 downloaded successfully
alternatives.log  boot.log   btmp  dpkg.log  fontconfig.log  journal  lightdm  README  wtmp
apt       bootstrap.log  cups  faillog   hp      lastlog  private  runit
Created /var/log/tarpn_startstop.log
Created /var/log/tarpn_command.log
Created /var/log/tarpn_neighbor_port_association.log
Created /var/log/tarpn_rxtarpnstat_service.log
Created /var/log/tarpn_service.log
Created /var/log/tarpn_home.log
Created /var/log/tarpn_linkstatus.log
Created /var/log/tarpn_runbpq.log
Created /var/log/tarpn_home_webapp_copylog.log
Created /var/log/tarpn_ninotnc_getall.log
Created /var/log/tarpn_home_runtime.log
Created /var/log/tarpn_tarpnstat.log
Created /var/log/tarpn_mon.log
Created /var/log/tarpn_statusmonitor.log
-rw-rw-rw- 1 root pi 127 Apr 13 16:36 /var/log/tarpn_command.log
-rw-rw-rw- 1 root pi 133 Apr 13 16:36 /var/log/tarpn_control_panel.log
-rw-rw-rw- 1 root pi 124 Apr 13 16:36 /var/log/tarpn_home.log
-rw-rw-rw- 1 root pi 132 Apr 13 16:36 /var/log/tarpn_home_runtime.log
-rw-rw-rw- 1 root pi 139 Apr 13 16:36 /var/log/tarpn_home_webapp_copylog.log
-rw-rw-rw- 1 root pi 130 Apr 13 16:36 /var/log/tarpn_linkstatus.log
-rw-rw-rw- 1 root pi 123 Apr 13 16:36 /var/log/tarpn_mon.log
-rw-rw-rw- 1 root pi 145 Apr 13 16:36 /var/log/tarpn_neighbor_port_association.log
-rw-rw-rw- 1 root pi 134 Apr 13 16:36 /var/log/tarpn_ninotnc_getall.log
-rw-rw-rw- 1 root pi 126 Apr 13 16:36 /var/log/tarpn_runbpq.log
-rw-rw-rw- 1 root pi 139 Apr 13 16:36 /var/log/tarpn_rxtarpnstat_service.log
-rw-rw-rw- 1 root pi 127 Apr 13 16:36 /var/log/tarpn_service.log
-rw-rw-rw- 1 root pi 129 Apr 13 16:36 /var/log/tarpn_startstop.log
-rw-rw-rw- 1 root pi 133 Apr 13 16:36 /var/log/tarpn_statusmonitor.log
-rw-rw-rw- 1 root pi 129 Apr 13 16:36 /var/log/tarpn_tarpnstat.log
##### create bpq folder below /home/pi
##### get RUNBPQ
runbpq.sh ok
##### runbpq.sh downloaded successfully
#####
##### get TEST-INTERNET
test_internet.sh ok
##### runbpq.sh downloaded successfully
#####
##### get CONFIGURE NODE
configure_node_ini.sh ok
##### configure_node_ini.sh downloaded successfully
#####
##### get BOILERPLATE.CFG
boilerplate.cfg ok
##### boilerplate.cfg downloaded successfully
#####
##### get MAKE_LOCAL_BPQ.SH
make_local_bpq.sh ok
##### make_local_bpq.sh downloaded successfully
#####
##### get CHATCONFIG.CFG
chatconfig.cfg ok
##### chatconfig.cfg downloaded successfully
#####
##### get TARPN script
tarpn ok
##### tarpn downloaded successfully
#####


############### Lines deleted for brevity ########################

######
######
######
######
######      Raspberry PI will now reboot.  All is going well so far.
######      When we come back up, reconnect and do the command   tarpn
######      as per the   Initialize Raspberry PI for TARPN Node    web page
######
######
 16:47:11 up 12 min,  3 users,  load average: 1.03, 1.45, 1.02

Broadcast message from root@lumoxpacket on pts/1 (Mon 2026-04-13 16:47:13 EDT):

The system will reboot now!
|
tarpn<ENTER>
pi@lumoxpacket ~ $ tarpn pi@lumoxpacket:~ $ tarpn ### TARPN Bookworm203 RAMdisk directory /tmp/tarpn does not exist. Create it here and now ##### TARPN startup incomplete. I will run TARPN_START2 which will ##### complete the installation. This will also reboot again. ###### ###### ###### ###### ###### ###### ###### ###### ###### ###### ###### ###### ###### ###### ###### =TARPN_START2.SH Bookworm055= ###### ###### ###### ###### ###### ###### ###### ###### ###### ###### ###### ###### 16:47:54 up 0 min, 3 users, load average: 1.52, 0.43, 0.15 ###### ###### ###### --- ###### TARPN START 1 completed ok. We're almost done --- ###### ###### LOG-FILE-TRUNCATE script logfiletruncate.sh ok ##### logfiletruncate.sh script has been installed. ##### ##### ##### APT-GET-UPDATE ##### --- I know we just did this. ##### --- It won't take long if there is nothing to update. Hit:1 http://raspbian.raspberrypi.com/raspbian bookworm InRelease Hit:2 http://archive.raspberrypi.com/debian bookworm InRelease Reading package lists... Done W: http://raspbian.raspberrypi.com/raspbian/dists/bookworm/InRelease: Key is stored in legacy trusted.gpg keyring (/etc/apt/trusted.gpg), see the DEPRECATION section in apt-key(8) for details. ###### ###### ###### 16:48:20 up 0 min, 3 users, load average: 1.37, 0.43, 0.15 ###### ###### ###### ##### ##### ##### APT-GET DIST-UPGRADE ##### ##### Reading package lists... Done Building dependency tree... Done Reading state information... Done Calculating upgrade... Done 0 upgraded, 0 newly installed, 0 to remove and 0 not upgraded. ###### ###### ###### ############### Lines deleted for brevity ######################## 16:49:44 up 2 min, 3 users, load average: 1.36, 0.61, 0.23 ###### ##### ##### Download g8bpq_link_stress.py ##### g8bpq_link_stress.zip ok ##### ##### Unzip g8bpq_link_stress.zip ##### Archive: g8bpq_link_stress.zip inflating: g8bpq_link_stress.py ##### unzip successful. Moving g8bpq_link_stress.py sbin ##### ##### Configure the PI OS 'backend' to enable RealVNC server ##### Created symlink /etc/systemd/system/multi-user.target.wants/vncserver-x11-serviced.service → /lib/systemd/system/vncserver-x11-serviced.service. ###### ###### ###### 16:49:46 up 2 min, 3 users, load average: 1.81, 0.71, 0.27 ###### ###### ###### ##### Done. After reboot you will be ready to test and/or ##### configure your TNC boards and to start BPQ node. ##### ##### ###### ###### ###### ###### ###### Raspberry PI will now reboot. All is going well so far. ###### When we come back up, reconnect and try the tarpn command ###### as per the ###### Set Up Raspberry PI for TARPN Node - Make SDcard ###### web page ###### ###### ###### ###### ###### 16:49:51 up 2 min, 3 users, load average: 1.66, 0.70, 0.27 ###### ###### ###### ###### ###### ###### ###### ###### ###### ###### ###### ###### ###### ###### ###### 5 4 3 2 1 0 Broadcast message from root@lumoxpacket on pts/1 (Mon 2026-04-13 16:49:56 EDT): The system will reboot now! pi@lumoxpacket ~ $ Connection to 10.0.0.238 closed by remote host. Connection to 10.0.0.238 closed. |

|
There are quite a few 'devices' in a Linux system. The NinoTNC A4 boards show up as ttyACM0 through ttyACM4 in this example. |
Enter 'ttyUSB' or 'ttyACM'  at this next prompt.
         Your standard TNC's device name = not_set -->ttyACM
|

|
There are several programs and means provided which con connect to your node, and then into the network to do commands, get diagnostics, and connect to remove user-provided applications.
These include:
QTtermTCP, TARPN-HOME, tarpn tx, tarpn host, and Telnet. This display is shown in the QTtermTCP program. |
pi@lumoxpacket ~ $ tarpn config
#### =TARPN vb103 =
####
####
#### =CONFIGURE_NODE.SH v77 =
####
####


This is the first tiem you've run this configurator.

local_op_callsign = none -->k1qrm


        I'm going to use your callsign to auto-fill some of the identification
        and then put you into the configurator in the verbose mode but with
        some of the answers filled in.


I've set up some of the required identification callsigns based on k1qrm.
node callsign=k1qrm-2
BBS callsign =k1qrm-1
CHAT callsign=k1qrm-9
                                   These callsigns and -SSID numbers
                                   will be what the other nodes expect.
                                   You will be prompted for these same
                                   values shortly.  You can <RETURN>
                                   to accept if the offer is correct.

                                   Hit <RETURN> to continue
|
infomessage1: Lumox's node at the north end of Spongotown.
infomessage2: Vertical yagi pointing at FRED and quad-band-vertical for the other 4 ports.
infomessage3: Icom IC1271A   1292.1 to FRED
infomessage4: Icom IC228     145.53 to DEXTER
infomessage5: Kenwood TM3530 223.42 to SIMON2
infomessage6: GE Master II   50.120 to BILLM
infomessage7: Icom IC4AT used to go to GERRY -- anybody want to link to me?
infomessage8: Lumox is usually on the CHAT network -- feel free to ring at PIUSER as well.
Any unused infomessage lines can be left with a period or with not_set Ctext
pi@lumoxpacket ~ $ tarpn config ############################################################################ This program prompts for configuration values you will see a description/name of each config item, and then you will see the current value of that config item. If you like the current value, just hit ENTER/RETURN on your keyboard. To change the setting, type a new value and then hit ENTER/RETURN. Your changes are saved when you reach the end of this program. Use Control-C on your keyboard to exit without saving changes. local op callsign is used by the node when an operator controls the node locally. This is used for CHAT, for sending and receiving packets and messages when the local operator is involved. This should be set to your legal callsign, with no -SSID, or to the word 'none'. If this is set to none, then console access is disabled. You can use the same local op callsign on more than one node. local_op_callsign = k1qrm --> keep the default offering of k1qrm NODE CALLSIGN The node callsign is probably your callsign dash 2, for instance: w1aw-2 The software limitations are that it can be -0 through -15 but convention has it that you not use -0 or -15. -2 is sort of a standard around here. Node Callsign = k1qrm-2 --> keep the default offering of k1qrm-2 NODENAME. This is 6 characters, allupper case, and is usually your first name, last name, or some abbreviation of your first name. Choose something the other node operators can remember for you. Node Name, max 6 chars, no spaces or punctuation = 6letters -->starbk SYSOP password is for answering the PASSWORD challenge. See http://www.cantab.net/users/john.wiseman/Documents/Node%20SYSOP.html You should probably leave set this to the group password or discuss it with who-ever is managing the L3 and L4 parameters for your node. Note: No double quotes, no single quotes and no ampersands. SYSOP password = not_set -->thequickbrownfoxjumpedoverthelazydogsback0123456789timesuntilhewasdead BBS Callsign Leave set to not_set unless you want to operate a BBS on this Raspberry PI You can change this later. Set bbscall to be your callsign -1 To switch off the BBS function, set the BBS Callsign to a period . BBS Callsign = k1qrm-1 --> keep the default offering of k1qrm-1 CHAT callsign Every G8BPQ node in the network has a CHAT service. Each nees a unique callsign which cannot be the same as any BBS or node in the network. We recommend using the owner operator callsign with a -9. CHAT callsign = k1qrm-9 --> keep the default offering of k1qrm-9 LOCATION: Lattitude and Longitude. This information is used to automatically create network maps which will be public and published at high resolution. The information is needed to allow the maps to show relative positions of the various nodes. It should be precise BUT it does not need to be accurate! I recommend putting it in the next neighborhood or something obscure. Just try to make it indicative both of what town your node is in and where you are relative to the other nearby nodes in your local network. Enter latitude, longitude for your node representation on maps. Use Google Earth or GPS receiver to appropriate values. Lat/Lon format in the US should be something like 33.4515,-83.7773 4 decimal places on each should be good enough. ### node location, lat, lon = 10.0000, -->35.89,-78.68 INFO TEXT This next value is the INFO message text. This is what the user gets if they use the I or INFO command. This text can be several lines long. Each line is in a separate field. infomessage1 is the 1st line. infomessage8 is the last line. not_set lines are removed from the INFO response. This is the current output for the INFO text: -------------------------------------------------------------------------------- not_set not_set not_set not_set not_set not_set not_set not_set -------------------------------------------------------------------------------- Now you can change any lines. I recommend you copy and paste from a text file as you go through this so you can get the result you want. Any line that is not to be used should be left as not_set or may be set to have just a period. Lines with a period in the first character will be replaced with not_set and not_set lines will not be included in the INFO response. Note: No double quotes, no single quotes, no colons, and no ampersands. INFO line 1 = not_set -->Lumox's node at the north end of Spongotown. INFO line 2 = not_set -->Vertical yagi pointing at FRED and quad-band-vertical for the other 4 ports. INFO line 3 = not_set -->Icom IC1271A 1292.1 to FRED INFO line 4 = not_set -->Icom IC228 145.53 to DEXTER INFO line 5 = not_set -->Kenwood TM3530 223.42 to SIMON2 INFO line 6 = not_set -->GE Master II 50.120 to BILLM INFO line 7 = not_set -->Icom IC4AT used to go to GERRY -- anybody want to link to me? INFO line 8 = not_set -->Lumox is usually on the CHAT network -- feel free to ring at PIUSER as well. -------------------------------------------------------------------------------- The Connect-Text is sent to a station that connects to the node. keep it short and sweet. Town name, or neighborhood and town. Note: No double quotes, no single quotes, no colons, and no ampersands. Connect-Text = not_set -->node op is Starbuck, N. Spongotown near National Guard range -------------------------------------------------------------------------------- The next part enables and configures up to ten NinoTNC A3 and A4 neighbors. There is a separate place later in the process to describe generic USB TNCs and NinoTNC A2 units. There is room for 2 of these. The neighbor is described as a callsign with SSID (usually -2) and a frame-acknowledge-delay, or FRACK. The FRACK is the number of milliseconds it takes for your NinoTNC to transmit a full length packet message, and how long it takes for your neighbor to send you back a full length packet message. This time includes the TX-RX-TX switchover times. A too-short FRACK is devistating because perfectly good packets will be tossed out some of the time. A too long FRACK wastes time but only if the link is already getting packet errors. Recommended starter values are 9000 for 1200 baud and 3000 for 9600 baud. 1200 baud -> FRACK of 9000 2400 baud -> FRACK of 6000 4800 baud -> FRACK of 5000 9600 baud -> FRACK of 3000 Note that some of the data radios are very fast at switching and can have a lower FRACK. Alinco DR135 and relatives are very slow and will have a higher FRACK. You'll have to test your link with your neighbor and see what you can get away with. Watch the retry rate shown in the R R response in QT-Term. Leave neighbor callsign as NOT_SET if you don't need to add another The order of neighbors is unimportant. The program will figure out which NinoTNC each neighbor connects to. The FRACK is associated with the NinoTNC that the matching neighbor comes in on. Neighbor callsign should be something like k1qrm-2 Callsign for a neighbor node 'A' = NOT_SET -->ka1okq-2 FRACK for first neighbor 'A' = 9000 -->4000 Callsign for a neighbor node 'B' = NOT_SET -->k2cc-2 FRACK for first neighbor 'B' = 9000 -->5000 Callsign for a neighbor node 'C' = NOT_SET -->ve2bmq-2 FRACK for first neighbor 'C' = 9000 -->4000 Callsign for a neighbor node 'D' = NOT_SET -->ka1prr-2 FRACK for first neighbor 'D' = 9000 -->4000 Callsign for a neighbor node 'E' = NOT_SET --> keep the default Now configure the USB-serial KISS devices. DO NOT USE these for NinoTNC A3 and A4 TNCs. The newer NinoTNCs are handled by the Neighbor mechanism. These USB TNC Port specifications have TxDelay parameters which are passed to G8BPQ. If your KISS device understands the TXDELAY KISS value, it will be configured from this TXDELAY value. Serial Baud value is used between the USB adapter and the TNC's CPU. The over-the-air TNC baud bit-rate must be set by the TNC itself. Ports 11 and 12 are USB ports but are highly customizable in support of non-traditional TNCs but may be used for older NinoTNCs, A0, A1, A2. The default values are appropriate for a NinoTNC A2. NinoTNCs ignore the TxDelay value, and require 57600 baud. USB TNC port 11 - user specified /dev port enable or disable = DISABLE --> keep the default USB TNC port 12 -- user specified /dev port enable or disable = DISABLE --> keep the default ------------------------------------------------------------------- #### Done. Now to overwrite the node.ini file with the new configuration. Make sure you use tarpn test to test the node before making it auto. The new configuration will be used the next time G8BPQ is loaded. pi@starbucknode ~ $ |
pi@starbucknode ~ $ tarpn test #### =TARPN vb103 = ##### ##### TEST -- Starts BPQ node immediately and runs it in the foreground until ##### a control C is issued in this window, or until a tarpn stop ##### command is issued in another window. source url exists node.ini exists. tarpn usb ##### ##### Show ttyUSB and ttyACM devices (NinoTNC) found in /dev ##### ##### ------------- start ttyACM0 ttyACM1 ttyACM2 ttyACM3 ##### ------------- end ##### List of tty ports called out in node.ini ##### ##### ------------- start neighborA:KA1OKQ-2 neighborB:K2CC-2 neighborC:VE2BMQ-2 neighborD:KA1PRR-2 ##### ------------- end ##### ##### ##### ##### Starting BPQ Node by calling RUNBPQ.SH runbpq.sh: hello user >>pi<< #### =RUNBPQ vB044 = #### =MAKE LOCAL BPQ v138 Number of NinoTNC A3 and A4 units using ttyACM# device name = 5 Enable BBS application local-op-callsign is specified. Enable HOST mode chatcall:k1qrm-9 SUCCESS... ### RUNBPQ.SH: ### RUNBPQ.SH: Launching G8BPQ node software. Note, this script does not end ### RUNBPQ.SH: until the node is STOPPED/control-C etc.. ### RUNBPQ.SH: G8BPQ AX25 Packet Switch System Version 6.0.21.40 March 2021 Copyright ? 2001-2021 John Wiseman G8BPQ Current Directory is /home/pi/bpq Configuration file Preprocessor. Using Configuration file /home/pi/bpq/bpq32.cfg Conversion (probably) successful PORTS 0x234af0 LINKS 0x239fd8 DESTS 0x23aa20 ROUTES 0x23d2c0 L4 0x23d7a0 BUFFERS 0x243e10 Route/Node recovery file BPQNODES.dat not found - Continuing without it Initialising Port 01 ASYNC /dev/ttyACM0 Chan A Initialising Port 02 ASYNC /dev/ttyACM1 Chan A Initialising Port 03 ASYNC /dev/ttyACM2 Chan A Initialising Port 04 ASYNC /dev/ttyACM3 Chan A Initialising Port 32 Telnet Server Starting Chat Config File is /home/pi/bpq/chatconfig.cfg Chat Started Starting Mail Config File is /home/pi/bpq/linmail.cfg Config Processed Config File /home/pi/bpq/WP.cfg Line 0 - file I/O error Mail Started slave device: /dev/pts/1. symlink to /home/pi/minicom/com1 created slave device: /dev/pts/2. symlink to /home/pi/minicom/com4 created slave device: /dev/pts/3. symlink to /home/pi/minicom/com5 created slave device: /dev/pts/4. symlink to /home/pi/minicom/com6 created slave device: /dev/pts/5. symlink to /home/pi/minicom/com7 created slave device: /dev/pts/6. symlink to /home/pi/minicom/com8 created TNC Emulator Init Complete |
pi@starbucknode ~ $ tarpn #### =TARPN vb103 = ##### BPQ node is running. BPQ node background Service is (AUTO) ##### TARPN HOME is NOT running. TARPN HOME is not enabled. ##### Raspberry PI is a >>> type 4 B 2GB made in UK <<< ##### OS version is "Raspbian GNU/Linux 11 (bullseye)" ##### Ethernet MAC=dc:a6:32:52:b7:d0 CPU temp=47.0'C SDcard=1599350888 ##### Use tarpn help for subcommand list. pi@starbucknode ~ $ |
pi@starbucknode ~ $ tarpn home start #### =TARPN vb103 = ##### HOME is not set to run. #### tarpn home start ##### ##### Starting TARPN-HOME ##### ##### HOME is not set to run in the background. Turning on... ##### HOME background has been set to ON ##### Note: It may take 3 minutes for TARPN-HOME to start running. ##### Use tarpn command to check the status. ##### If NODE is running in the service start mode, you can access HOME by ##### setting your web browser to your-node-IP:8085. Make sure you refresh ##### your web browser if TARPN-HOME is not responsive. This will occur ##### on some changes of computer or node status. pi@starbucknode ~ $ |
##### TARPN HOME is running. TARPN HOME is set to START |