TNC and Radio Adjust and Test
Packet radio transmissions are sent from a TNC as audio, through a transmitter, through a receiver, and into another TNC, still as audio.
It is important that at no time does the audio get noise into it, get overdriven (clipping) or have parts cut off because the transmitter
and receiver weren't ready when the packet starts. This will take adjustment of these parameters:
- Wide vs Narrow
- Transmit audio level
- TxDelay
- Receive audio level
See also Configure NinoTNC.
See also Debug a poor link
Wide vs Narrow
Some modern radios have an option to select Wide vs Narrow. This is done because some countries have mandated that commercial 2-way FM equipment
should operate with a narrow bandwidth. To my knowledge, packet radio, even 1200 baud, is NOT compatible with narrow bandwidth. Set the radios to wide.
Make sure you know how to put your radio into and out of automatic SCAN, and PRIORITY modes.
Built in digital signal processing
It is also important that the radio not modify the timing of the audio during any single transmission or reception.
Digital Signal Processing designed for voice operations is often
not good for packet radio.
Radio Power-saving Sleep modes
Many battery powered radios have modes designed to save energy.
This will also not be good for packet radio as usually these systems poll the receive channel for activity instead of being available immediately for incoming traffic.
For radios with this kind of behavior, it is best to open the squelch wide.
Some radios also do power savings by disabling the processor altogether until PTT is depressed.
In some cases this can dramatically increase the time required to go into transmit.
Radios with transmit latencies which are variable, or which take longer than 1/4 of a second (25 character times) should probably not be used for 1200 baud (or faster) packet radio.
A simple test of a potential radio's transmit delay is to use the microphone and click the PTT as fast as you can while listening on another transceiver.
Speak a long heeellloooo into the microphone while listening to the audio on the receiver.
Does the chop follow your PTT behavior?
Is the audio ready as soon as the radio goes into transmit?
Use this to compare potential radios.
No radio is instantaneous but you'll quickly get the idea that some radios are much worse than others for packet radio networking!
Some modern microprocessor-heavy radios even lock up and crash under rapid transmit receive exchanges.
Make sure power saving functionality is completely disabled.
Transmit Audio Level for 1200 baud microphone wired TNCs
Many of the TNCs in our network are wired into the microphone jack on the transceiver.
This section addresses adjustments to the transmit level for those TNC/radio sets.
In order to perform the adjustment in just this way you will need to be using a TNC with a hardware potentiometer which you can operate while the TNC is in service.
The TNC-PI, NinoTNC, MFJ-1270 series, PacComm Tiny-2 series, are all capable of this.
The KPC-3 and TinyTrack-4 are not.
For those units you will need to follow the TNC operator manual for this adjustment.
The goal in setting the transmit audio level is to minimise errors in the packets sent over the point to point radio link you are adjusting.
The best way requires coordination between the transmitter on your end, and the receiver on the other end.
In practice the wide band FM transceivers are very similar but unless you have both ends in the same room you can't really push your transmitter to be ideal, lest you have to go back and do it again and again.
It is better to leave your transmitter at a little bit less audio drive (from the TNC into the microphone jack) than might seem ideal.
The basics of this adjustment is to observe the transmitted signal using a receiver or station-monitor-analyzer while causing the TNC to transmit packets as continuously as possible.
Tune the TxLevel from the TNC to find the maximum level the transmitter is capable of sending, i.e. overdriving the transmitter, then back down the TxLevel until the received signal becomes narrower or quieter.
If the transmitter level decreases noticeably based on your measurement equipment, then you are no longer over-driving the transmitter.
If you are doing this by ear, you will likely end up with a transmit level that is less than ideal, but this is a great start.
To rough in your transmit level for 1200 and 2400 baud
To proceed you need to know the frequency and port-number of the TNC and radio you are adjusting.
You need to know where the potentiometer is which makes the TxLevel adjustment and also the potentiometer which adjusts the TXDELAY (how long the PTT is asserted before packets start).
On the NinoTNC the potentiometer is the furthest from the LEDs.
You will need a tiny phillips-head screwdriver.
You will need a local monitor receiver (secondary to the packet station).
I recommend an HT.
To rough in your transmit level for 1200 and 2400 baud:
- Tune the local monitor receiver, at the transmit site, to the frequency of your transmitter.
- Connect to Linux using Terminal or Putty.
- Type this as a Linux command: tarpn linktest # where # is the port number.
This command will generate 100 numbered packets about 80 characters long.
- Set the TXDELAY potentiometer to just short of the maximum clockwise position.
- Adjust the receiver level on the local monitor receiver to a level slightly louder than comfortable, but not so loud that the receiver is distorted.
This level will depend on the quality of your speaker.
With an HT it might be better to turn the volume down and hold it closer to your ear.
- Adjust the transmit level across its entire range and verify that you can tell the changes in transmit level on the monitor receiver.
- Set the transmitter TNC-PI so it's transmit level is just below the maximum (from the HT's receive perspective) that you can set it to.
There is a point in the transmit audio level control, where the level will top out and everything beyond that is "overdriving" which will just be distorted and useless at the receive end.
Set the transmitter audio level control to just below the point where the level tops out.
- During the time the TNC is attempting to transmit you should turn the potentiometer where you can hear the quality and level of the transmit audio change.
What you are looking for is the point on the potentiometer where the level is slightly lower than full volume and thus slightly lower than the distorted level.
This is something you'll have to hear to understand.
- You can take your time making this adjustment so long as you don't overheat your radio.
Obviously take care that your chosen frequency is a good link frequency and not some repeater input!.
- If you need more time, send the tarpn linktest <portnum> again.
- At some point you'll need to set the TXDELAY potentiometer to just slightly longer than the minimum where the link works, but that is for a later step.
Just don't forget.
To rough in your transmit level for 4800 and 9600 baud
This operation requires an inexpensive SDR and associated computer application.
This section is under construction.
Please see the n9600a Operation page of the
NinoTNC documentation section.
TxDelay adjustment
See
FAQ-TxDelay
The electrical control that affects TxDelay may be handed in several different ways.
For the NinoTNC, the TxDelay is set using a front panel potentiometer.
For other TNCs, the adjustment may require a password-level node command, or may require writing a config file, or may be as simple as turning a knob.
To tune TxDelay, turn on a monitor receiver or HT. Set the TxDelay to an arbitrary high value (just less than max clockwise on the NinoTNC, and then adjust it down after you have established a connection to the desired station.
Do something on the link to keep it going back and forth, and then migrate the TxDelay counterclockwise until the link fails, then turn it back up a small amount.
Moderate link performance can be achieved with a high TxDelay but you will definitely want to adjust it down later for optimal performance.
The value of a typical TxDelay is usually between 150 milliseconds and 400 milliseconds for the commercial radio we're typically using.
The data radios have a very short TxDelay.
Some devices can go on the air in as little as several milliseconds.
We can make some radio-specific recommendations for TxDelay settings but the receiver used on the link also impacts the number.
You really need to test it to find out.
Once you get your link to work, you should keep notes as to what TxDelay you have used and how well the link worked.
If the TxDelay is much too short, the link won't work at all.
If the TxDelay is much too long, you will hear the time wasting lead-in noise.
The tricky part is when the TxDelay is slightly too short.
If you want to know what the time-wasting lead-in noise sounds like, set the TxDelay to long and listen to the transmitted signal.
The actual numerical value used to set TxDelay is usually in 10s of milliseconds so a starting value of 90 would make sense.
However, the setting for a USB-serial TNC (ports 11 and 12) in the
tarpn config command is in 1s of milliseconds so a value of 900 makes sense.
Be sure of your context.
A 10 to 1 difference is important!
A cycle of repetitive adjustments of transmit level, receive level, txdelay
It is relatively easy to adjust one of these critical settings if the other two settings are already perfect.
Since this is rarely the case, the operator will go through a sequence of adjusting each setting, and then repeat through the sequence until no further adjustment is necessary.
The TX-DELAY and TX-LEVEL can be roughed in without participation from the receiving station, but to finely adjust these two, the receiving station will have to participate.
It is possible to fine tune TX-DELAY and TX-LEVEL without an observer at the receiving station, but it is not as rapid or as clear during the process.
The good news is that the NinoTNC has a pretty good AGC - Automatic Gain Control - for receive levels, so the receive adjustment is not critical.
For some transceivers, the receive level is not a user serviceable adjustment.
The goal of adjusting these parameters is to have your link deliver all of the transmitted packets to the other receiver, and to optimize the timing of that delivery.
A more important goal is to have the transmitters operate within legal emissions parameters, but if the radios are capable of that, then optimizing the delivery of packets will acheive optimal spurious emissions as well.
Your transmitter should be working well and your frequency selection is a legal frequency for packet radio and for the bit-rate you have selected, and you won't be interfering with another station by operating.
Receive Audio Level
Set the receive level by adjusting the volume on the FM transceiver itself.
The ideal receive level is one where the TNC decodes every packet perfectly.
The NinoTNC has a handy feature where it will flicker the red CRC LED when the receive volume is too high.
To rough in this signal, open the squelch on the radio and turn the volume up until the CRC LED lights up.
Now turn the volume down until the red light no longer illuminates.
When a receive packet is heard, the red light should not illuminate or flicker.
Keep in mind, however, that the goal is to receive all of the packets, not get some ideal voltage.
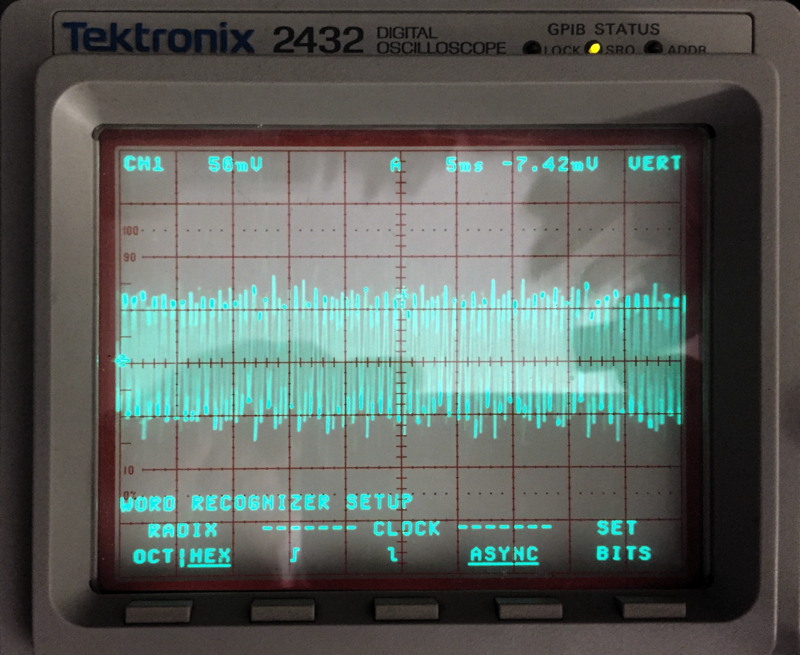
With an oscilloscope you can measure the receive level coming into the NinoTNC by clipping your probe onto the RXA scope loop.
Also note that the peak to peak voltage of the waveform will include a separate component for the low tone and the high tone in a 1200 baud packet.
For a NinoTNC, the minimum voltage for the low frequency wave is 0.4 V but the desired voltage is around 2 V and the maximum is just over 3 V
See also
Oscilloscope for measuring Rx Audio Level.
Rx audio adjust using linktest
A utility application is provided to generate test data over the link to permit easy adjustment of the transmit level and receive volume control.
tarpn linktest # will send a numbered series of 80 byte packets at a rate of once every couple of seconds.
First the transmitting station
Rx audio adjust having no tools
The no-tools method of adjusting the receive level is to generate packet data from the far end, and then tune the receive level (volume control?) up and down to find the limits of where the packets are decoded, and then leave the adjustment in the middle.
Start by launching
qt-term on the Raspberry PI and connect into the network.
Turn on
Monitor for the port you are tuning, and turn off all the other
monitored ports.
Send a connect request to the station at the other end of the link.
Hint: You can do a
C # !NODENAME.
Use port-number for #.
The nodename is the station at the other end.
Use
! to get your node to do a
DOWNLINK to the other station, instead of a
CIRCUIT.
If you use
DOWNLINK, the connection will be made over the specified port, regardless of the node lists or route table data.
This is a kludge because the node software will not respect the timing on the channel when both downlinks and circuit traffic are both present.
However, it does get the station on the other end to answer in a timely manner using the radio link you are attempting to test.
This is especially if the other end thinks it has a better route via some other link.