|
The TNC-PI is discontinued.
Support for TNC-PI is no longer expected to work on Raspberry PIs set up for TARPNs.
The TARPN project created the NinoTNC as a replacement for the TNC-PI.
NinoTNC is easier to build (as a kit), more powerful, easier to configure, easier to operate.
I'm leaving these TNC-PI pages intact, but the tools and commands referenced here only exist because they didn't get in the way, much.
Some elements will disappear from the TARPN tools over the next several years.
Please check out the NinoTNC at TARPN hardware projects documentation.
|
Configure TNC-PI
This document discusses how to use the
tarpn i2c tools. These are used for telling the TNC‑PI its i2c address, and for setting persistance and tx-delay.
See also
TNC‑PI General Info, and
Ribbon Cable
See also
TNC and Radio Adjust and Test
See also
Debug a poor link
The first thing that must be done with each TNC-PI is to set it's address.
This process is the next step after TNC-PI assembly and must be performed in order to use a TNC-PI with the TARPN installation.
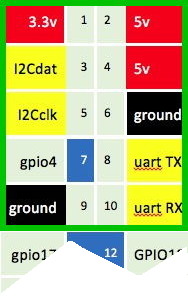
Interconnect header, JP2
The TNC-PI has a 2x5 header for attaching a ribbon chaining the Raspberry PI together with 1 or more TNC-PI.
This 2x5 header is pinned to mate with the first 10 pins of the Raspberry PI's 40 (or 26) pin header.
The 10 pins of the ribbon cable pass power, ground, an I2C bus and a TTY asynchronous serial port.
Red-board TNC-PI is shipped from the factory with an I2C address of 0.
In this case the TNC-PI will communicate with the Raspberry PI using the async serial bus which only permits one TNC-PI to be attached at a time.
Green-board TNC-PI is shipped from the factory with an I2C address of 9.
I2C allows many TNC-PI to be attached at a time.
But the TNC-PI must be assigned to different I2C addresses and the node software must be told what I2C address is mapped to what port number and what neighbor callsign.
The TNC-PI may be defaulted back to async on purpose or by accident.
If this happens, the i2c-assign command must be used to move a TNC-PI back to I2C.
The two ways the TNC-PI might have been moved to async are:
- set the TXDELAY potentiometer all the way to the left (0 TXDELAY)
- attach the TNC-PI to a bad voltage or reverse voltage (yet somehow not blow it up)
|
|
|
Important note: The Raspberry PI cannot talk to the TNC-PI at all if there are more than one TNC-PI with the same address on the I2C bus.
(bus means ribbon cable)
The I2C addresses are very easy to inspect and to assign.
You can quite easily re‑assign the I2C addresses as you assemble a multi‑port node using
tarpn i2c‑set (see below).
I recommend that you always assign the first, left or top, TNC‑PI to the lowest I2C address which is 3, and then proceed up in addresses as you go down or to the right in your system.
While the I2C numbers can range from 3 to 119 decimal, which is 03hex to 77hex, it is easiest to deal with addresses of 9 and under.
Higher numbers are represented differently in hexadecimal vs decimal displays. (see
Hexidecimal)
If you have a TNC‑PI you suspect is not assigned an I2C address, or which is unresponsive to the i2c commands, you may need to move it back to I2C from async.
The procedure to do this is
here: Async to I2C
Once you have set up the parameters and the I2C addresses, you can do I2C commands to each to make sure they are talking.
Once they are all moved to I2C and configured, run the
tarpn test
command and start the G8BPQ node. See the
TARPN Command List.
TNC‑PI features
|
The TNC‑PI has non‑volatile variables that set some features.
For TARPN purposes these have known and fixed values but each TNC needs to be configured for these values.
The configurables include:
|
|
TxDelay
|
Note that TXDELAY is set by using potentiometer R6 on the TNC‑PI.
However, the TNC‑PI may be configured in the i2c settings to set the TxDelay via i2c.
At this time we are recommending that TxDelay be controlled via R6 and not via i2c.
TXDELAY should be addressed any time you associate the TNC‑PI with a different radio, and possibly with a different link neighbor.
TXDELAY is how long after the transmitter is keyed the TNC will wait before sending data.
This variable tells the TNC‑PI what TXDELAY value to use, unless this variable is 0 in which case it tells the TNC‑PI to read the value of R6:TXDELAY potentiometer and use that.
The software TARPN uses to run the nodes will instruct the TNC‑PI to use 0, and will refresh this 0 value periodically, forcing the use of the potentiometer.
This means that any setting on the TNC‑PI non‑volatile variable will only be used intermittently.
For your sanity you should probably set this to 0 during initial configuration.
|
|
Persistance
|
Controls what chance out of 255 that this TNC select to transmit in a slot.
For a dedicated link, we set this to 215.
Since all of our ports are dedicated links, set this to 215.
(why not 255? Because once in a while both ends of the link want to transmit and would keep sending at exactly the same time, colliding over and over.
Setting to 215 gives it a 1 in 5 chance of NOT transmitting immediately).
|
|
Slot Time
|
Sets how long a slot is.
This is the amount of time where we can’t know if a station that could go into transmit and collide with us has actually gone into transmit.
It is roughly equivalent to the worst TxDelay for any TNC on the channel.
This value is used in calculations for channel sharing.
The TNC will decide to wait some number of slots as calculated using the Persistance value.
Lacking information on the radio performance as I type this, 15 is probably fine. That's about 150mS or 1/7th of a second.
|
|
TXTail
|
How long after the packet message is completed before the TNC unkeys the transmitter, in milliseconds.
For 1200 baud packet we set this to a very low value, like 1.
|
|
I2C Address
|
This value is 0 if the TNC is to use the tty‑async‑serial port to talk to the Raspberry PI.
This value is from 3 to 119 decimal to specify an address on the I2C bus.
Note that in some places the i2c address is shown using Hexadecimal Numbers.
Also note that the TNC-PI will continue to use its old I2C address until it is power cycled or reboot.
Use tarpn i2c-set addr 15 2 (register 15, write to 2) to instruct the TNC-PI to reboot.
|
Manuals for TNC‑PI
TNC‑PI Kit Ordering and Assembly
TNC‑PI General Info
Coastal Chipworks'
tnc‑x.com: TNC PI assembly instructions and Operating Tips
TARPN Commands for configuring TNC‑PI
tarpn i2c
Read the I2C bus and find out what TNC‑PI addresses are currently attached to the top of the Raspberry PI.
Note that the address readout is in HEXIDECIMAL.
See
FAQ: Hexadecimal Numbers
to convert the HEX addresses to decimal, one at a time, for your convenience.
Sorry.
Note: I2C commands will not work if the G8BPQ node software is running.
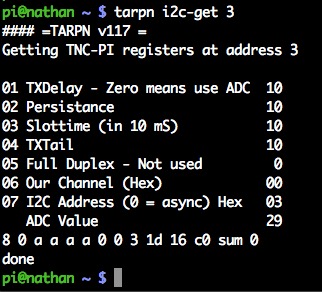
tarpn i2c‑get
Read all parameters from a TNC‑PI at a particular address
Use with TNC address in decimal. Reads all parameters.
Example:
tarpn i2c‑get 16 reads all registers from TNC at I2C address 16 decimal.
Note: Due to a feature and a bug in the i2c architecture, this command may fail to read the data from the TNC‑PI and will instead produce suspiciously correct looking results.
The dead give‑away that the data you are reading is garbage is that the I2C address figure will be incorrect.
Simply run the command over and over until the data looks correct.
Rumor has it that this is made worse if the TNC‑PI involved is receiving data from the radio.
Try unplugging the TNC from the radio and then unplugging and replugging the ribbon cable.
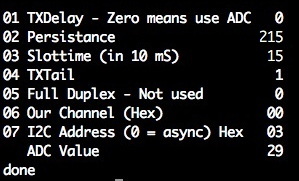
pi@nathan ~ $ tarpn i2c‑get 4
#### =TARPN v127 =
Getting TNC‑PI registers at address 4
01 TXDelay ‑ Zero means use ADC 00
02 Persistance 215
03 Slottime (in 10 mS) 15
04 TXTail 0
05 Full Duplex ‑ Not used 0
06 Our Channel (Hex) 00
07 I2C Address (0 = async) Hex 04
ADC Value 29
8 3 28 0 a 0 0 0 4 1d 70 c0 sum 0
done
pi@nathan ~ $
Notice that register 7 shows the i2c address for the TNC‑PI.
Setting register 7 (using
tarpn i2c‑set) will allow you to change the i2c address.
If you set it to 0, the TNC‑PI will no longer respond to I2C at all and will now respond to async bus commands including the
i2c‑assign command.
If you change the I2C address you will have to power cycle the TNC‑PI or give it the register 15 reset command.
See below.
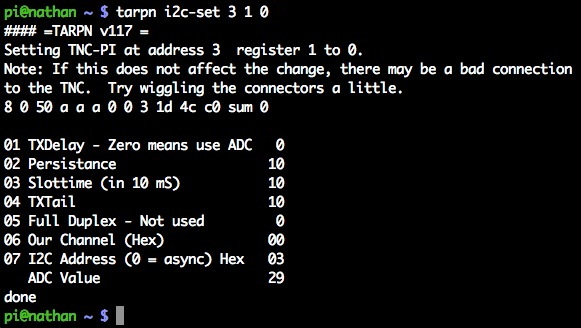
tarpn i2c‑set
Write a parameter change to a TNC‑PI at a particular I2C address use with address in decimal, parameter number, and new value
Example:
tarpn i2c‑set 9 1 60 set TNC‑PI address 9's registers 1 to 60.
tarpn i2c‑set 9 7 3 change the I2C address of a TNC‑PI from the default 9 to new address 3.
tarpn i2c‑set 9 15 2 tell the TNC‑PI to reboot, so it starts using address 3.
Note: Due to an implementation issue outside of our control, any command may fail to write or read‑back the data from the TNC‑PI and will instead produce suspiciously correct looking results.
The dead give‑away that the data you are reading is garbage is that the I2C address figure will be incorrect.
You may repeat the command indefinitely until you get back good looking data.
Unplugging the radio from the TNC and then resetting the TNC‑PI by unplugging and replugging the ribbon cable may fix the problem.
tarpn i2c‑assign
This command is used to take a blank TNC‑PI which has not been assigned an I2C address, and to give it its first I2C address.
See
Configure TNC‑PI to I2C for more information.
Procedures for Configuring TNC‑PI
Below are procedures for
- detecting all I2C TNC‑PIs on the Raspberry PI
- reading configuration registers on the I2C TNC‑PI
- programming configuration registers on the I2C TNC‑PI
Detecting I2C Devices
If your Raspberry PI is idle, i.e. no G8BPQ node is running, you can do the command
tarpn i2c which
will deliver the detect chart.
pi@smithnode ~ $ tarpn i2c
#### =TARPN v117 =
Scanning for attached TNC‑PIs
note: Addresses found are shown in HEXADECIMAL.
     0  1  2  3  4  5  6  7  8  9  a  b  c  d  e  f
00:          03 04 -- 06 -- -- -- 0A -- -- -- -- --
10: -- -- -- -- -- -- -- -- -- -- -- -- -- -- -- --
20: -- -- -- -- -- -- -- -- -- -- -- -- -- -- -- --
30: -- -- -- -- -- -- -- -- -- -- -- UU -- -- -- --
40: -- -- -- -- -- -- -- -- -- -- -- -- -- -- -- --
50: -- -- -- -- -- -- -- -- -- -- -- -- -- -- -- --
60: -- -- -- -- -- -- -- -- -- -- -- -- -- -- -- --
70: -- -- -- -- -- -- -- -- |
That table shows the hexadecimal addresses found
during the detection run. If you aren't familiar with hexadecimal,
see
FAQ‑Hexadecimal.
Here you can see that we have detected four TNC‑PIs, and one other
unknown device. The TNC‑PI addresses are 03hex, 04hex, 06hex, 0Ahex. The decimal
values for those same devices would be 3, 4, 6, 10. The UU device is at address 3Bhex
which would be 59decimal. I don't know what that is. I've seen it on other Raspberry PIs
but it doesn't seem to impact the operation of the node software. I have not tried assigning
a TNC‑PI to 59decimal to see what happens.
Note: If you have more TNCs connected than are showing on the attached TNC‑PI table, unplug all but one TNC from te ribbon and run the command again.
Repeat for each TNC.
It is possible you have more than one TNC assigned to the same I2C address.
If that is the case, use the commands tarpn i2c‑get and tarpn i2c‑set to change its address.
See this link: Change I2C Address of TNC‑PI for details.
Read the current configuration from your I2C TNC‑PI
If your Raspberry PI is idle, i.e. no G8BPQ node is running, you can do the command
tarpn i2c‑get to
read the configuration registers on the TNC‑PI. In this example the TNC‑PI has unusable values in its registers.
I didn't have a stock new TNC to play with so I just messed up the registers in one of mine for demonstration.
Note, if you don't get an answer, or you get a failure, you may be getting noise into the modem via the radio.
Try the command several times.
A clue that readback worked just fine is that register 7 will show your TNC's
I2C address correctly.
The good news is that G8BPQ node software does a better job of getting data from the TNC‑PI than these utilities do.
If it works at all using these utilities, our experience is that it will work perfectly with the G8BPQ node program.
The biggest cause for incorrect reading of the registers is fixed by testing without a radio hooked to the TNC-PI.
If this becomes a trial, disconnect the radio from the TNC-PI and then reset the TNC-PI by using
tarpn i2c-set as described below.
Now read the registers.
Set TNC‑PI parameters, TxDelay, Persistance, Slottime, TXTail
Set the i2c register 01 (TXDelay) to 0. This instructs the TNC to use the R6 potentiometer and the ADC (Analog to Digital Converter) to obtain its transmit delay (TXDELAY) value.
The TXDelay adjustment, using the R6 potentiometer, is discussed in a later step in
TNC and Radio adjust and test, also linked below.
For now, set register 01 (TXDelay) to 0.
tarpn i2c‑set 3 1 0
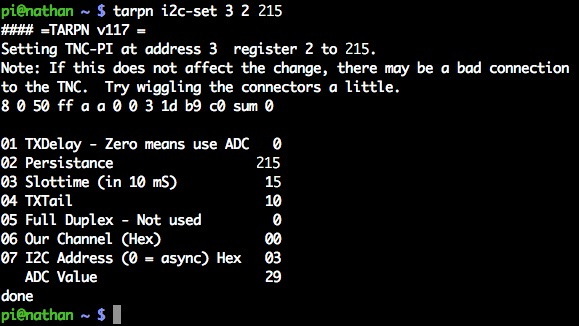
Use tarpn i2c‑set to set the Persistance value in register number 2 to 215.
This tells the TNC that most any time the channel is clear it is ok to transmit.
tarpn i2c‑set 3 2 215
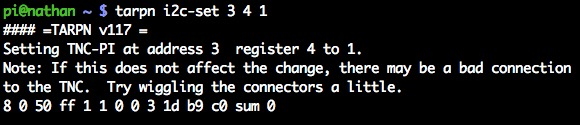
Set Slottime to 15, TXTAIL to 1.
tarpn i2c‑set 3 3 15
tarpn i2c‑set 3 4 1
|
|
|
Register 01 TXDelay should be set to 0.
The Persistence should be set to 215.
The Slottime should be 15.
The TXTail should be 1.
Full Duplex should be 0.
Our Channel should be 0.
I2C Address is the address you wrote to the TNC and it will match
the I2C address you used for the command however it is
displayed here in hexadecimal.
|
Additional clues
There is a register #15 which does some debug diagnostic things.
Writing 2 to register 15 will tell the TNC to reboot.
Writing 3 asks the TNC to key up and send high tone for several seconds followed by low tone for several seconds.
Next step: TNC and Radio adjust and test
Further materials about the TNC‑PI
TNC‑PI General Info